Experimenting with Blender’s Grease Pencil Interpolation
Discover how you can build simple animations quickly and easily with Blender’s Grease Pencil interpolation.


About a year ago, Blender added Grease Pencil Interpolation, a new feature that automatically creates the frames between two different keyframes, similar to After Effect's Path animation. This might sound like a small breakthrough, but it's incredibly helpful for artists who use Blender to create 2D animations.
Before interpolation was introduced to Grease Pencil, most animation had to be made frame by frame or in Object Mode, which only allowed a few adjustments. With this update, artists don't have to create frame after frame painstakingly. Instead, the tool automatically adds frames between strokes in different keyframes to animate any stroke or fill. In addition, artists can create animations inside Draw Mode and edit the entire thing in Object Mode.
It's a super exciting tool that speeds up your work and makes it more fun!
How to use Blender's Grease Pencil Interpolation
Let's experiment with the tool to better understand how it works.
Here's a quick rundown of the steps:
Step 1: Add strokes on two keyframes
In the video demo, we added a stroke on the 20th frame, which automatically turned it into a keyframe. Make sure that the strokes from the two keyframes are similar. In our example, the shapes on the first keyframe were created using a single stroke. So the shapes on the 20th keyframe should be made the same way—using one stroke.
Step 2: Interpolate the sequence
Move the time marker anywhere between the two keyframes. Select Draw > Interpolate Sequence. The strokes in the first keyframe will then be animated; they'll transform into the strokes in the 20th keyframe.
Step 3: Polish the animation
How do you assign which stroke transforms into what?
To assign each stroke, you have to select the strokes from both keyframes. Following our video demo, go to Edit Mode and toggle Multiframe. Then, select both keyframes (the start and end of the animation) on the timeline. The strokes on both frames should be visible.
Then, select a stroke from the first keyframe and then immediately choose the stroke from the end keyframe that you want it to transform into.
After selecting the strokes and their corresponding end strokes, select Grease Pencil > Interpolate Sequence.
Check out our video for more examples of more complex Blender animations.
Tips for using the Grease Pencil Interpolation tool
Now that you know the basics, let's find out how to maximize this nifty feature.
Adjust the interpolation settings

The default interpolation settings can be visually flat. It's better to adjust the settings to make the entire animation more dynamic.
- Steps - Refers to the number of steps it takes to move from one keyframe to another. For example, when the Step is set at 2, one keyframe will last for two frames, essentially animating the sequence at 12 frames per second (assuming the project is set at 24fps).
- Layer - Refers to the layer that you want to interpolate. Choosing "Only Selected” will only interpolate the stroke or points selected, and the layer settings will still apply.
- Flip Mode - In some cases, the tool automatically flips strokes to get to the intended keyframe. Selecting "No Flip” prevents strokes from rotating.
- Smooth - Refers to how smoothly the software tries to create strokes in the interpolated frames. It reduces the jitters and noise in the strokes generated.
- Iterations - This setting is linked to the smoothness settings. It refers to how many times the tool will smooth the generated strokes.
- Type - Refers to the temporal flow of the interpolation. When set at "Linear,” the interpolation will have no easing of any sort.
Use Edit Mode and Sculpt Mode

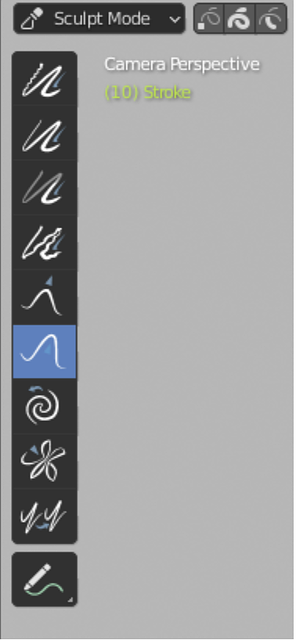
Since interpolation adds frames between the two keyframes, it's important to keep the strokes on the two keyframes as similar as possible. The best way to do this is to use the different modes available when creating the next keyframe.
Like in the video, use Edit Mode and/or Sculpt Mode to get the desired stroke instead of drawing a new stroke from scratch. This makes the animation process easier.
Add more in-betweens
 Adding more keyframes between keyframes helps the animation look more natural, even when the motion is simple. To add more in-betweens accurately,
- Interpolate two keyframes
- Convert one of the interpolated frames into a keyframe
- Edit or sculpt it accordingly
From there, you can interpolate the first keyframe to the second (the new one), then the second to the third, making the animation smoother.
Organize layering
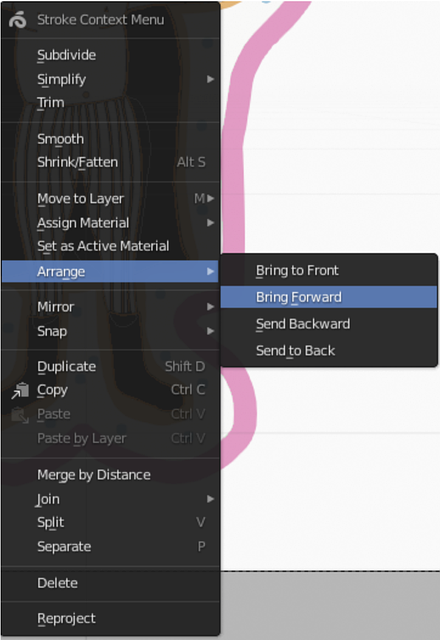
When interpolating strokes and fills, organizing your layers is important. We recommend keeping both your strokes and fills in one layer.
One helpful tip for this is toggling on Draw Behind, which can be found in the upper left corner of Draw Mode. This places all the strokes or fills created behind the existing strokes on the active layer.
The Grease Pencil Interpolation is easy to execute, and with a bit of practice and experimentation, you'll be creating smooth GIFs in no time. And you can share your work with the rest of the Pixabay community, too!